Building a Production-Ready Helm Repository on Nexus: A Practical Guide
In modern Kubernetes-based platforms, Helm has become the de facto standard for packaging and distributing applications. However, using Helm effectively in a team or enterprise environment requires more than just writing charts — it requires a reliable, versioned, and centralized distribution mechanism.
This article walks through the full lifecycle of setting up a Helm repository on Nexus, from repository creation to chart packaging, publishing, validation, and installation. More importantly, it explains the reasoning behind each step, focusing on long-term maintainability, reproducibility, and operational safety.
1. Why Use Nexus for Helm Charts?
Before diving into the implementation, it’s important to understand the motivation.
A Helm repository is not just storage — it is:
- A distribution layer for Kubernetes applications
- A version control mechanism for deployments
- A contract between DevOps and developers
Using Nexus as a Helm repository provides:
- Centralized artifact management
- Access control and authentication
- Integration with CI/CD pipelines (e.g., Jenkins)
- Immutable versioning when properly configured
https://github.com/faustobranco/devops-db/tree/master/knowledge-base/helm-repo
2. Creating the Helm Repository in Nexus
We start by creating a hosted Helm repository in Nexus:
Format: helm (hosted)
Deployment policy: Disable redeploy
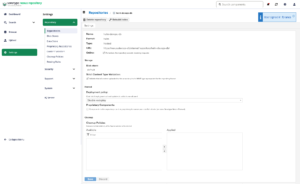
Repository URL:
https://nexus.devops-db.internal/repository/helm-devops-db/
Why these settings matter
Helm (hosted)
This ensures Nexus understands Helm-specific metadata and index structure.
Disable redeploy
This is critical.
- Prevents overwriting existing chart versions
- Enforces immutability
- Guarantees reproducibility of deployments
In practice, this means:
If version
1.0.6exists, it can never be replaced — only incremented.
This avoids one of the most dangerous anti-patterns in DevOps:
“Same version, different content”
3. Chart Structure: The Foundation
A valid and tested Helm chart must follow a predictable structure:
devops-api/
├── Chart.yaml
├── README.md
├── charts/
├── templates/
│   ├── configmap.yaml
│   ├── deployment.yaml
│   ├── ingress-canary.yaml
│   ├── ingress.yaml
│   ├── secret.yaml
│   └── service.yaml
└── values.yaml
Why structure matters
Helm is opinionated. This structure enables:
- Template rendering consistency
- Reusability of subcharts (
charts/) - Separation of configuration (
values.yaml) from logic (templates/)
Most importantly:
A chart must be fully testable locally before publishing
Publishing broken charts to a shared repository introduces cascading failures across environments.
4. Versioning: The Most Misunderstood Concept
Inside Chart.yaml:
apiVersion: v2
name: devops-api
description: A Helm chart for devops-api
type: application
version: 1.0.6
appVersion: "1.0.0"
Key distinction
version→ Helm chart versionappVersion→ Application version (informational only)
Why this matters
The Helm ecosystem treats these independently.
Chart version (version)
- Drives packaging and distribution
- Used by Helm to resolve upgrades
- Must follow semantic versioning
Application version (appVersion)
- Purely informational
- Does not affect deployment logic
- Can be omitted without impact
A critical principle:
The Helm chart must remain deployable independently of application versioning.
For example:
- You may change templates without changing the application
- You may update defaults without rebuilding the container
5. Packaging the Chart
To prepare the chart for distribution:
helm package devops-api/.
Output:
devops-api-1.0.6.tgz
Why packaging exists
Helm packages are:
- Immutable artifacts
- Versioned units of deployment
- Comparable to Docker images for Kubernetes manifests
This step ensures:
- All templates are bundled
- Version metadata is embedded
- The artifact is portable
6. Uploading to Nexus
Upload the packaged chart:
curl -u usr_jenkins_nexus:1234qwer \
  --upload-file devops-api-1.0.6.tgz \
  https://nexus.devops-db.internal/repository/helm-devops-db/
Why use curl (and not Helm push plugins)
Using curl provides:
- Simplicity
- CI/CD compatibility
- No dependency on Helm plugins
This makes pipelines more predictable and easier to debug.
Security note
Credentials should never be hardcoded in real scenarios. Use:
- Environment variables
- Secret managers
- CI/CD credential stores
7. Registering the Repository in Helm
To consume the repository:
helm repo add devops-db https://nexus.devops-db.internal/repository/helm-devops-db/
helm repo update
Why this step is required
Helm maintains a local cache of repository indexes.
helm repo update:
- Downloads
index.yaml - Refreshes available chart versions
Without this step, newly uploaded charts will not be visible.
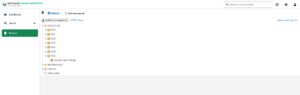
8. Verifying Published Charts
Search available charts:
helm search repo devops-db

NAME                     CHART VERSION  APP VERSION  DESCRIPTION
devops-db/devops-api     1.0.6         	            A Helm chart for devops-api
devops-db/iplocation-api 1.0.5          1.0.0        A Helm chart for iplocation api
devops-db/totp-api       1.0.7          1.0.0        A Helm chart for TOTP API Validator
Why verification matters
This step confirms:
- Chart indexing is working
- Version is correctly registered
- Metadata is readable
Skipping this step can lead to confusing deployment errors later.
9. Installing or Upgrading the Chart
Finally, deploy the application:
helm upgrade --install devops-api . \
  --values values.yaml \
  -n devops-api \
  --create-namespace
Why use upgrade --install
This is a best practice.
It ensures:
- Idempotency
- Safe re-runs in CI/CD
- No need to check if release exists
Why use values.yaml
Separating configuration allows:
- Environment-specific customization
- Reusability of the same chart
- Clean separation between code and config
10. End-to-End Flow Summary
The complete workflow:
- Create Helm repo in Nexus (immutable policy)
- Develop and test chart locally
- Define version in
Chart.yaml - Package chart (
helm package) - Upload artifact (via
curl) - Update Helm repo index locally
- Validate availability (
helm search) - Deploy using
helm upgrade --install