Slack – How to Create a Slack Webhook to Send Alerts to a Channel
After creating your Slack workspace and alert channel, the next step is enabling external systems to send messages into it.
This is done using Incoming Webhooks, a simple and powerful way to integrate automation, monitoring, and CI/CD pipelines with Slack.
In this guide, we’ll configure a webhook to send messages directly to the #devops-alerts channel.
I’ve always left all the passwords, URLs, and certificates for this project exposed here because it doesn’t cause me any problems, and it’s much easier to follow the examples and explanations; it’s an isolated environment without external access. But Slack doesn’t; the URLs are public, so some information here is masked.
Overview
This setup builds on the previous configuration:
- Workspace: DevOps-DB
- Channel:
#devops-alerts - Integration: Slack Incoming Webhook
The goal is to allow any system (scripts, tools, pipelines) to push messages into Slack.
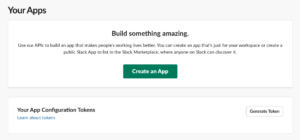
Step 1 — Enable Incoming Webhooks App
Slack uses apps to extend functionality. Incoming Webhooks is one of them.
- Go to:
https://api.slack.com/apps - Click Create New App
- Choose:
- From scratch
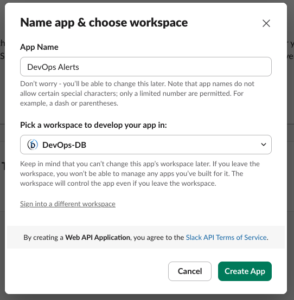
- Configure:
- App Name:
DevOps Alerts - Workspace:
DevOps-DB
- App Name:
Click Create App
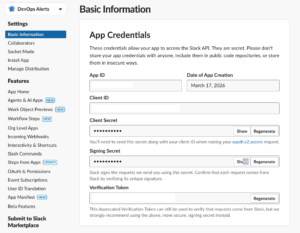
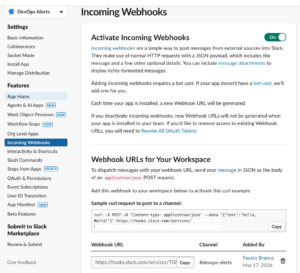
Step 2 — Activate Incoming Webhooks
- Inside your app settings, go to:
- Incoming Webhooks
- Enable the option:
Activate Incoming Webhooks → ON
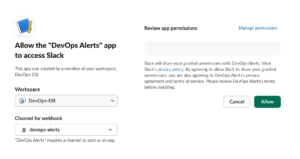
Step 3 — Create a Webhook URL
- Scroll down and click:
- Add New Webhook to Workspace
- Select the channel:
#devops-alerts - Click Allow
Slack will generate a webhook URL like:
https://hooks.slack.com/services/T00000000/B00000000/XXXXXXXXXXXXXXXXXXXXXXXX

Treat this URL as a secret — anyone with it can send messages to your channel.

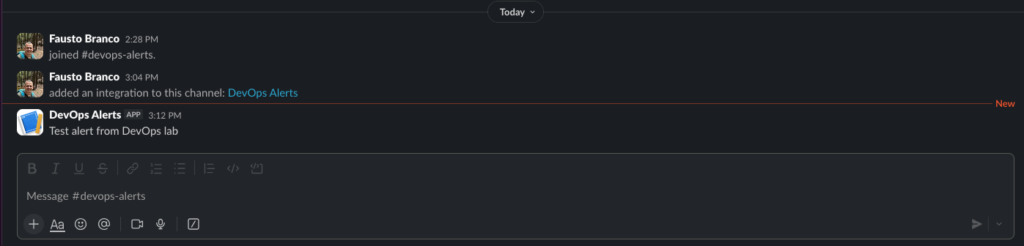
Step 4 — Send a Test Message
You can now send messages using a simple HTTP request.
Example using curl
curl -X POST -H 'Content-type: application/json' \
--data '{"text":"Test alert from DevOps lab"}' \
https://hooks.slack.com/services/T00000000/B00000000/XXXXXXXXXXXXXXXXXXXXXXXX
If everything is configured correctly, you will see the message appear in: #devops-alerts
Step 5 — Common DevOps Use Cases
Once configured, this webhook can be used in multiple scenarios:
Monitoring Alerts
- Prometheus Alertmanager
- Grafana alerts
- Custom monitoring scripts
CI/CD Notifications
- Build success/failure
- Deployment status
- Pipeline stages
Automation Scripts
- Cron jobs
- Backup status
- Infrastructure changes
Perfeito — vou adicionar isto como uma nova secção no artigo, mantendo o mesmo estilo 👍
Step 7 — Designing Slack Messages with Block Kit Builder
Creating raw JSON payloads manually can quickly become error-prone, especially when building structured alerts.
https://app.slack.com/block-kit-builder
To simplify this process, Slack provides a visual tool called the Slack Block Kit Builder.
This tool allows you to design, preview, and generate message payloads in real time.
Why Use Block Kit Builder
Instead of guessing JSON structures, you can:
- Build messages visually
- Preview how they will appear in Slack
- Generate production-ready payloads
- Reduce formatting errors
This is especially useful for DevOps alerts where clarity and structure are critical.
How It Works
- Open the Block Kit Builder
- Start adding blocks (sections, fields, headers, etc.)
- Preview the message on the right side
- Copy the generated JSON
The output can be used directly in your webhook requests.
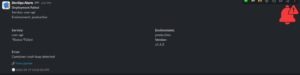
Example — Structured DevOps Alert
Below is a practical example of a formatted alert message:
{
	"blocks": [
		{
			"type": "section",
			"accessory": {
				"type": "image",
				"image_url": "https://devops-db.com/wp-content/uploads/2026/03/error_17383012.png",
				"alt_text": "Error icon"
			},
			"text": {
				"type": "mrkdwn",
				"text": "*Deployment Failed*\nService: user-api\nEnvironment: production"
			}
		},
		{
			"type": "section",
			"fields": [
				{
					"type": "mrkdwn",
					"text": "*Service:*\nuser-api"
				},
				{
					"type": "mrkdwn",
					"text": "*Environment:*\nproduction"
				},
				{
					"type": "mrkdwn",
					"text": "*Status:*Failed"
				},
				{
					"type": "mrkdwn",
					"text": "*Version:*\nv1.4.2"
				}
			]
		},
		{
			"type": "section",
			"text": {
				"type": "mrkdwn",
				"text": "*Error:*\nContainer crash loop detected"
			}
		},
		{
			"type": "context",
			"elements": [
				{
					"type": "mrkdwn",
					"text": "🔗 <https://example.com|View pipeline>"
				}
			]
		},
		{
			"type": "context",
			"elements": [
				{
					"type": "mrkdwn",
					"text": "🕒 2026-03-17 19:32:10 UTC"
				}
			]
		}
	]
}Sending the Block Kit Message via Webhook
To use this payload, simply include it in your webhook request:
curl -X POST -H 'Content-type: application/json' \
--data '{
	"blocks": [
		{
			"type": "section",
			"accessory": {
				"type": "image",
				"image_url": "https://devops-db.com/wp-content/uploads/2026/03/three-quarter_17382650.png",
				"alt_text": "Error icon"
			},
			"text": {
				"type": "mrkdwn",
				"text": "*Deployment pending approval*"
			}
		},
		{
			"type": "section",
			"fields": [
				{
					"type": "mrkdwn",
					"text": "*Service:*\nuser-api"
				},
				{
					"type": "mrkdwn",
					"text": "*Environment:*\nproduction"
				},
				{
					"type": "mrkdwn",
					"text": "*Status:*\nWaiting for Approval"
				},
				{
					"type": "mrkdwn",
					"text": "*Version:*\nv1.4.2"
				}
			]
		},
		{
			"type": "actions",
			"elements": [
				{
					"type": "button",
					"text": {
						"type": "plain_text",
						"text": "Approve"
					},
					"style": "primary",
					"url": "https://example.com/approve"
				},
				{
					"type": "button",
					"text": {
						"type": "plain_text",
						"text": "Reject"
					},
					"style": "danger",
					"url": "https://example.com/reject"
				}
			]
		}
	]
}' \
https://hooks.slack.com/services/T00000000/B00000000/XXXXXXXXXXXXXXXXXXXXXXXX

curl -X POST -H 'Content-type: application/json' \
--data '{
	"blocks": [
		{
			"type": "section",
			"accessory": {
				"type": "image",
				"image_url": "https://devops-db.com/wp-content/uploads/2026/03/error_17383012.png",
				"alt_text": "Error icon"
			},
			"text": {
				"type": "mrkdwn",
				"text": "*Deployment Failed*\nService: user-api\nEnvironment: production"
			}
		},
		{
			"type": "section",
			"fields": [
				{
					"type": "mrkdwn",
					"text": "*Service:*\nuser-api"
				},
				{
					"type": "mrkdwn",
					"text": "*Environment:*\nproduction"
				},
				{
					"type": "mrkdwn",
					"text": "*Status:*Failed"
				},
				{
					"type": "mrkdwn",
					"text": "*Version:*\nv1.4.2"
				}
			]
		},
		{
			"type": "section",
			"text": {
				"type": "mrkdwn",
				"text": "*Error:*\nContainer crash loop detected"
			}
		},
		{
			"type": "context",
			"elements": [
				{
					"type": "mrkdwn",
					"text": "🔗 <https://example.com|View pipeline>"
				}
			]
		},
		{
			"type": "context",
			"elements": [
				{
					"type": "mrkdwn",
					"text": "🕒 2026-03-17 19:32:10 UTC"
				}
			]
		}
	]
}' \
https://hooks.slack.com/services/T00000000/B00000000/XXXXXXXXXXXXXXXXXXXXXXXX
Recommended Workflow
A practical workflow for DevOps environments:
- Design the message in Block Kit Builder
- Copy the generated JSON
- Store it as a template
- Inject dynamic values (host, metrics, status)
- Send via webhook
Best Practices
- Store the webhook URL securely (e.g., environment variables)
- Avoid hardcoding it in repositories
- Use structured messages for readability
- Separate channels by purpose (alerts vs deployments)
- Keep alerts concise and readable
- Use emojis for quick visual context (🚨, ✅, ⚠️)
- Group related information using fields
- Standardize message formats across systems
Final Result
You now have:
- A Slack workspace (
DevOps-DB) - A dedicated alert channel (
#devops-alerts) - A working webhook integration
- The ability to send automated messages from any system
Conclusion
Incoming Webhooks provide one of the simplest ways to integrate Slack into a DevOps workflow.
With minimal setup, you gain real-time visibility into your systems and create a foundation for more advanced alerting and automation pipelines.