Installation
The installation of Jenkins for this Lab, initially I did it in Docker, due to lack of resources, with the new server, I created a VM and that’s why I leave here the two ways of installation, with some small differences in access, Docker, I use the port 8081:8080 and for the VM port 80.
To install this Jenkins, I am using a VM created in Vagrant with Ubuntu 22.04 and fixed IP.
Vagrantfile:
Vagrant.configure("2") do |config|
  config.vm.define "srv-infrastructure-jenkins-master-01", autostart: true do |jenkins|
    jenkins.vm.box = "bento/ubuntu-22.04"
    jenkins.vm.hostname = 'srv-infrastructure-jenkins-master-01'

    jenkins.vm.network "public_network", use_dhcp_assigned_default_route: true, bridge: "enp7s0", ip: "172.21.5.154"
    jenkins.vm.synced_folder "/work/", "/work"
    jenkins.vm.provider :virtualbox do |v|
        v.customize ["modifyvm", :id, "--natdnshostresolver1", "on"]
        v.customize ["modifyvm", :id, "--memory", 1024]
        v.customize ["modifyvm", :id, "--name", "srv-infrastructure-jenkins-master-01"]
    end
  end
end
The Jenkins installation procedure is very simple, add the repo to Ubuntu and install it. Jenkins needs Java to run, so we will also install it.
sudo wget -O /usr/share/keyrings/jenkins-keyring.asc https://pkg.jenkins.io/debian-stable/jenkins.io-2023.key
echo "deb [signed-by=/usr/share/keyrings/jenkins-keyring.asc]"  https://pkg.jenkins.io/debian-stable binary/ | sudo tee /etc/apt/sources.list.d/jenkins.list > /dev/null

sudo apt update
sudo apt install -y jenkins
sudo apt install -y fontconfig openjdk-17-jre
Once everything is installed, you can now start the service.
systemctl daemon-reload

sudo systemctl enable jenkins

sudo systemctl start jenkins

sudo systemctl status jenkins
Port Configuration.
By default, Jenkins is always created with the port configuration 8080. For the VM I want to use the default port 80. Which leads to a problem: Jenkins run the service with the user “jenkins:jenkins” and ports below 1024, only sudoers can bind to a service.
And for this to be possible, I leave two possibilities:
1 – Change User to root
Change the parameters below in the /lib/systemd/system/jenkins.service file:
vi /lib/systemd/system/jenkins.service

Environment="JENKINS_PORT=8080"
User=jenkins
Group=jenkins
to
Environment="JENKINS_PORT=80"
User=root
Group=root
Reload the service and restart it.
systemctl daemon-reload

sudo systemctl stop jenkins

sudo systemctl start jenkins
Check:
sudo lsof -i -P -n | grep LISTEN
java      24059            root    8u  IPv6 306137      0t0  TCP *:80 (LISTEN)
2 – Give the Jenkins service permissions to bind to port 80:
Create the configuration folder for the Jenkins service:
mkdir /etc/systemd/system/jenkins.service.dNow, let’s create a configuration file and assign CAP_NET_BIND_SERVICE permission to the service.
vi /etc/systemd/system/jenkins.service.d/bind.conf[Service]
AmbientCapabilities=CAP_NET_BIND_SERVICE
Reload the service and restart it.
systemctl daemon-reload

sudo systemctl stop jenkins

sudo systemctl start jenkins
Check:
lsof -i -P -n | grep LISTEN
java      24197         jenkins    8u  IPv6 309922      0t0  TCP *:80 (LISTEN)
I personally prefer the second option, I don’t want the service to run as sudo.
First settings.
To unlock Jenkins and be able to create the first administrative account, you need to check a file created during installation with an initial “password”. This password will be immediately revoked after creating the account.
$ cat /var/jenkins_home/secrets/initialAdminPassword

f6ab091b020a4cd0ad1edefbbb53e57a
Installation ready: Let’s open the URL: http://jenkins.lab.devops-db.info
The first thing to do is unlock Jenkins with the admin password that was indicated during installation:

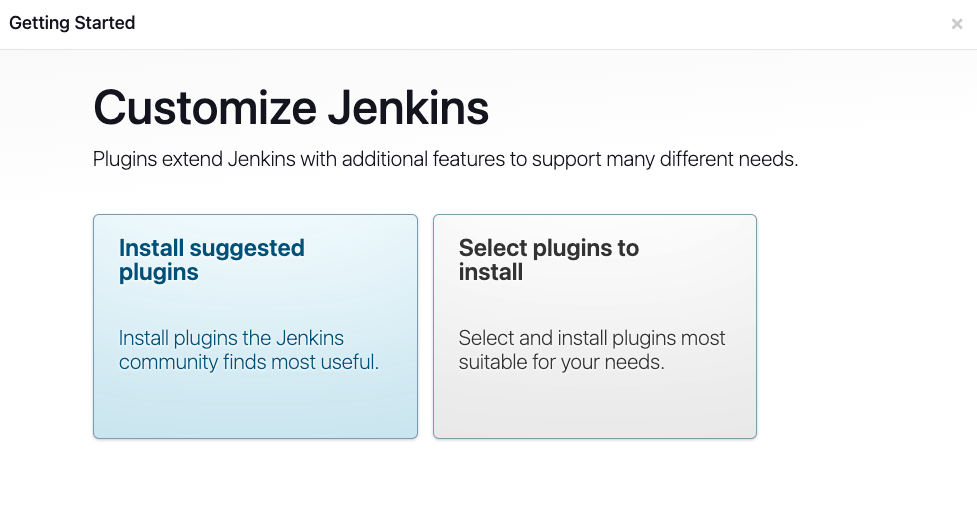
There are now two options, install the suggested plugins or install manually, if you are still not sure what you need to install and it is just for the Lab, I strongly recommend installing the suggested plugins. This step takes a while.

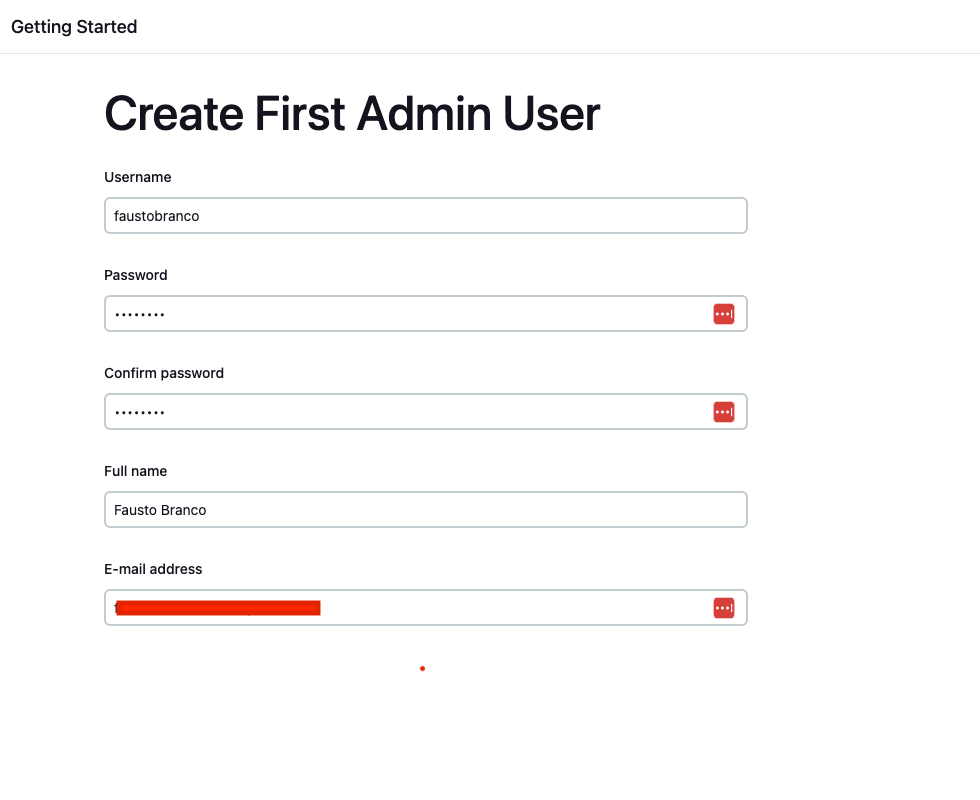
Create your first administrative account:

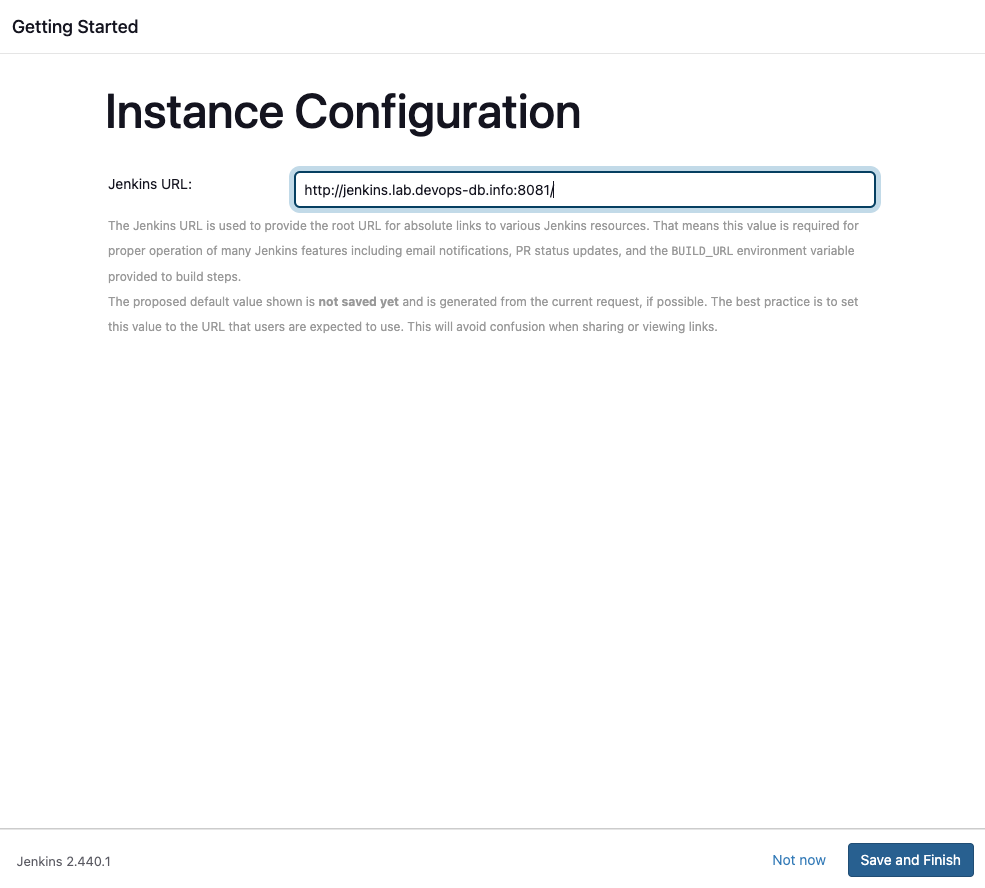
Configure the URL: I will use the url configured in the internal DNS here.

There is a Docker image on Jenkins’ official Docker Hub and in this case, it makes it easier, as I don’t intend to install it on a VM.
Docker compose makes container creation easier.
The ports that I will expose for this container are:
- 8081:8080
- 50000:50000
There are two volumes, one is for the folder where Jenkins stores the Pipelines information and I will map it to a folder on my Host, so there’s no problem of having to recreate the container and losing the images.
For DNS, I will use the URL: jenkins.lab.devops-db.info (https://devops-db.com or devops-db.internal).
With docker-compose in hand:
version: "3"
services:
  jenkins:
    container_name: srv-jenkins-01
    image: jenkins/jenkins:lts
    ports:
      - "8081:8080"
      - "50000:50000"
    volumes:
      - /XXXXXXXX/Work/Jenkins/jenkins-server-01:/var/jenkins_home
      - /var/run/docker.sock:/var/run/docker.sock
    restart: unless-stopped
    networks:
      - jenkins_bridge
networks:
  jenkins_bridge:
    name: jenkins_bridge
    driver: bridge
$ docker-compose up
[+] Running 1/1
✔ Container srv-jenkins-01 Created 0.6s
Attaching to srv-jenkins-01
srv-jenkins-01 | Running from: /usr/share/jenkins/jenkins.war
srv-jenkins-01 | webroot: /var/jenkins_home/war
...
srv-jenkins-01 | *************************************************************
srv-jenkins-01 |
srv-jenkins-01 | Jenkins initial setup is required. An admin user has been created and a password generated.
srv-jenkins-01 | Please use the following password to proceed to installation:
srv-jenkins-01 |
srv-jenkins-01 | f6ab091b020a4cd0ad1edefbbb53e57a
srv-jenkins-01 |
srv-jenkins-01 | This may also be found at: /var/jenkins_home/secrets/initialAdminPassword
srv-jenkins-01 |
srv-jenkins-01 | *************************************************************
...During installation, Jenkins displays the initial admin password information, use it to log in as soon as the installation is ready.
If you can’t copy it, go into the container’s bash and look for the file:
$ cat /var/jenkins_home/secrets/initialAdminPassword

f6ab091b020a4cd0ad1edefbbb53e57a
Installation ready: Let’s open the URL: http://jenkins.lab.devops-db.info:8081/
The first thing to do is unlock Jenkins with the admin password that was indicated during installation:

There are now two options, install the suggested plugins or install manually, if you are still not sure what you need to install and it is just for the Lab, I strongly recommend installing the suggested plugins. This step takes a while.

Create your first administrative account:

Configure the URL: I will use the url configured in the internal DNS here.

Leave a Reply