From DevOps API to Self-Documented Platform: Building and Documenting a Go API with Swagger in Kubernetes – Part 2
At this stage, our DevOps API was already fully operational and deployed in Kubernetes (From DevOps API to Self-Documented Platform: Building and Documenting a Go API with Swagger in Kubernetes – Part 1). It was integrated with GitLab, capable of retrieving semantic version tags, exposing multiple endpoints, and accessible via a Gateway API backed by Traefik.
However, despite being functional, the API had a critical limitation: it lacked discoverability and self-documentation.
Every consumer needed prior knowledge of:
- available endpoints
- required query parameters
- expected responses
This is where Swagger (OpenAPI) becomes essential.
Why Swagger?
Swagger transforms an API from a black box into a self-describing contract.
Instead of relying on external documentation or tribal knowledge, Swagger provides:
- interactive documentation
- real-time request execution
- standardized API contracts
- automatic synchronization with code
Given that our API was already in production, the goal was not to redesign it — but to incrementally enrich it with documentation, without breaking its existing structure.
Step 1: Installing Swagger Tooling (swag)
The Go ecosystem provides an excellent tool called swag, which generates OpenAPI specifications directly from code annotations.
We installed it using:
go install github.com/swaggo/swag/cmd/swag@latest
Step 2: Understanding the Go Module Name
Before integrating Swagger into the application, it is essential to understand how Go modules work.
Swagger generates a docs package, which must be imported into the application. This import depends on the module name defined in go.mod.
To identify the correct import path:
cat go.mod
Example:
module devops-api
This means the Swagger docs must be imported as:
package main

import (
	_ "devops-api/docs"

	"github.com/swaggo/http-swagger"
)
If the module were defined differently, for example:
module github.com/devops-db/devops-api
Then the import would need to reflect that:
_ "github.com/devops-db/devops-api/docs"
This step is critical — without it, Swagger will not be registered at runtime.
Step 3: Adding Swagger Annotations to Handlers
Rather than rewriting the API, we enhanced existing handlers with Swagger annotations.
For example, the /tags endpoint — one of the most important endpoints in our API — was documented as follows:
// @Summary Get repository tags
// @Description Get semver tags from a GitLab repository
// @Tags tags
// @Produce json
// @Param repo query string true "Repository path (e.g. services/reporting)"
// @Param sort query string false "Sort order (date|version)"
// @Param limit query int false "Limit number of results"
// @Success 200 {array} string
// @Failure 400 {string} string "Invalid parameters"
// @Failure 500 {string} string "Internal error"
// @Router /tags [get]
func tagsHandler(w http.ResponseWriter, r *http.Request) {
We applied similar annotations across all endpoints:
/health/databases/schemas/blueprints/platforms/blueprints/environments/blueprints/services
This approach ensured that:
- no logic was changed
- documentation stayed close to implementation
- future updates remain synchronized
Step 4: Generating Swagger Documentation
With annotations in place, we generated the Swagger specification:
swag init
This command creates a new directory:
/docs
  docs.go
  swagger.json
  swagger.yaml
The docs.go file contains the embedded Swagger specification and must be compiled with the application.
Step 5: Serving Swagger UI
To expose the Swagger UI, we added the following dependency:
go get github.com/swaggo/http-swagger
Then, in the main application:
package main

import (
	"database/sql"
	"fmt"
	"net/http"
	"os"

	_ "github.com/lib/pq"

	_ "devops-api/docs"

	"github.com/swaggo/http-swagger"
)
And registered the Swagger route:
http.Handle("/swagger/", httpSwagger.WrapHandler)
Once deployed, the Swagger UI became available at:
http://devops-api.devops-db.internal/swagger/index.html
Step 6: Rebuilding and Deploying
Since Swagger generates code that becomes part of the application, we needed to:
- Run
swag init - Commit the generated
/docsdirectory - Rebuild the Docker image
- Push to Nexus
- Redeploy via Helm
This resulted in version 1.1.0 of our devops-api.
Step 7: Verifying the Result
Once deployed, the Swagger UI provided:
- categorized endpoints (health, tags, databases, schemas, blueprints)
- parameter input fields
- real-time execution
- actual responses from GitLab and PostgreSQL
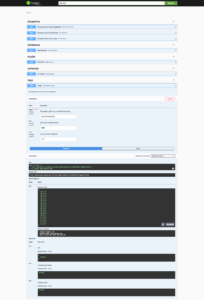
For example, executing:
GET /tags?repo=services/reporting&sort=date
returns:
[
  "v0.1.0",
  "v0.1.1",
  ...
  "v1.3.0"
]
This confirms that the documentation is not static — it is directly connected to the live system.
Key Takeaways
Adding Swagger was not about generating documentation — it was about turning the API into a consumable interface.
The most important aspects of this implementation were:
- keeping documentation close to the code
- avoiding structural changes
- ensuring compatibility with existing deployments
- leveraging real data instead of mocks
With minimal changes, the DevOps API evolved from a functional service into a fully self-documented platform, ready to be consumed by developers, pipelines, and automation tools.
Conclusion
Swagger is often introduced early in projects, but integrating it into an existing, production-ready system provides a much stronger perspective.
In this case, the process demonstrated that:
A well-designed API does not need to be rewritten to be documented — it only needs to be described correctly.
With version 1.1.0, the DevOps API now exposes not only its functionality, but also its contract — making it significantly more powerful and easier to adopt.