Slack – How to Create a Slack Workspace and Alert Channel for a DevOps Lab (Free Tier)
In a DevOps environment, having a centralized place to receive alerts, notifications, and system events is essential.
Whether you’re working with CI/CD pipelines, infrastructure monitoring, or automation workflows, a messaging platform becomes a critical component of your observability stack.
Slack provides a simple and effective way to achieve this — even on the free plan.
This guide walks through the complete process of creating a workspace and setting up a dedicated alert channel, using a real lab example.
I’ve always left all the passwords, URLs, and certificates for this project exposed here because it doesn’t cause me any problems, and it’s much easier to follow the examples and explanations; it’s an isolated environment without external access. But Slack doesn’t; the URLs are public, so some information here is masked.
Overview
This setup was created with the following configuration:
- Workspace name: DevOps-DB
- Channel name:
#devops-alerts - Plan: Free
The goal is to simulate a real-world DevOps communication layer where systems can push alerts and events.
Step 1 — Create a Slack Workspace
Start by creating your workspace:
- Navigate to https://slack.com
- Click Get Started
- Enter your email address
- Confirm the verification code sent to your inbox
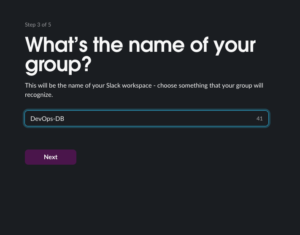
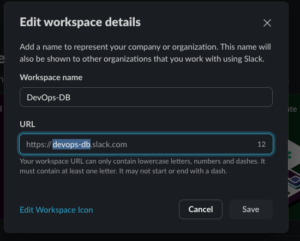
- When prompted, define your workspace name: DevOps-DB
- Slack will automatically generate a workspace URL: https://devops-db.slack.com
- Skip the invitation step if you are setting up a personal lab
Once completed, your workspace is ready to use.
Step 2 — Confirm Free Plan
By default, Slack workspaces are created under the Free plan.
To verify:
- Click your workspace name (top-left corner)
- Go to Settings & administration → Billing
- Confirm that the plan is listed as Free
No additional configuration is required.
Step 3 — Create an Alert Channel
In Slack, what many refer to as a “group” is actually a channel.
To create one:
- In the left sidebar, click Add channels
- Select Create a new channel
- Configure the channel:
- Name: DevOps-DB
- Description (optional): Channel for infrastructure alerts and system notifications
- Choose visibility:
- Public (recommended for labs)
- Private (if access should be restricted)
- Click Create
Your alert channel is now available as: #devops-alerts
Step 4 — Add Members (Optional)
If you are working with a team:
- Open the
#devops-alertschannel - Click Add people
- Select users or invite via email
For a personal lab, this step can be skipped.
Step 5 — Recommended Channel Structure for DevOps Labs
To better simulate production environments, consider organizing channels by function:
#devops-alerts→ Monitoring and system alerts#deployments→ CI/CD pipeline notifications#infrastructure→ Infra-related updates#general→ Communication and notes
This structure helps isolate signal from noise and improves clarity.
Step 6 — Using Slack for Alerts and Automation
Once the channel is created, it can be integrated with:
- CI/CD tools (GitHub Actions, GitLab CI)
- Monitoring systems (Prometheus, Grafana, Alertmanager)
- Custom scripts and webhooks
- Infrastructure events (Terraform, Ansible)
Slack becomes a central event bus for your lab.
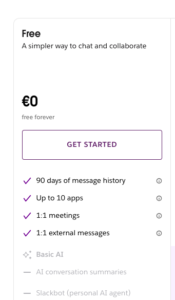
Limitations of the Free Plan
While powerful, the free tier includes some constraints:
- Message history limited to 90 days
- Limited number of app integrations
- No group calls (only 1:1)
- Limited file storage
For lab environments, these limitations are typically acceptable.
Final Result
At this stage, you should have:
- A fully functional Slack workspace: DevOps-DB
- A dedicated alert channel: #devops-alerts
- A foundation ready for integrations and automation
Conclusion
Setting up Slack as part of your DevOps lab is a quick win that brings immediate value.
It introduces structure, enables observability, and prepares your environment for more advanced integrations such as alerting pipelines and automated incident notifications.
Even on the free plan, it is more than capable of supporting realistic DevOps workflows.