Jenkins – Vault Integration
After installing Vault. Now we need to configure Jenkins for the integration, create the user and show in a simple secrets structure how a simple pipeline works.
Authentication
The first step is to create an authentication for Jenkins in Vault, for this we will use an approle:
The approle auth method allows machines or apps to authenticate with Vault-defined roles. AppRole’s open design enables a diverse set of workflows and configurations to handle large numbers of applications. This auth method is oriented to automated workflows (machines and services), and is less useful for human operators. We recommend using batch tokens with the AppRole authentication method.
https://developer.hashicorp.com/vault/docs/auth/approle
An “AppRole” represents a set of Vault policies and login restrictions that must be met in order to receive a token with those policies. The scope can be as narrow or broad as desired. An AppRole can be created for a particular machine, or even a particular user on that machine, or a service spread across machines. The credentials required for successful login depend upon the constraints set on the AppRole associated with the credentials.
We will do this via CLI, directly on the Vault host, but if you already understand the structure, you can do this via web or API.
Once logged in with an administrative account, we first need to enable the approle authentication type:
$ vault auth enable approle
Success! Enabled approle auth method at: approle/
With that enabled, let’s create an approle called jenkins-role. This approle will be used in Jenkins for integration with Vault.
token_num_uses (integer: 0) – The maximum number of times a generated token can be used (no lifetime); 0 means unlimited. If you require the token to have the ability to create child tokens, you will need to set this value to 0.
secret_id_num_uses (integer : 0) – Number of times any particular SecretID can be used to fetch a token from this AppRole, after which the SecretID will by default expire. A value of zero will allow unlimited uses. As always, this option can be overridden by the ‘num_uses’ request field when generating a SecretID.
$ vault write auth/approle/role/jenkins-role token_num_uses=0 secret_id_num_uses=0 policies=jenkins
Success! Data written to: auth/approle/role/jenkins-role
See that we created the approle and indicated a Policy called: jenkins.
We haven’t defined it yet, we’ll first create the Secrets structure and then it will be possible to create the policy.
We now need to read the jenkins-role information and get the role-id, leave it written down aside, as we will need it in Jenkins.
$ vault read auth/approle/role/jenkins-role/role-id
Key        Value
---        -----
role_id    2a89c925-62fc-44b7-fed5-d2de5e31cb69
The next step is to generate a secred_id for this approle, in the same way, keep this information securely written down, as it will be needed in Jenkins.
vault write -f auth/approle/role/jenkins-role/secret-id
Key                   Value
---                   -----
secret_id             f01e3323-ff2f-849d-e7a1-49805d2300e0
secret_id_accessor    8562d2e5-b093-7ba2-5b7f-6e7eedd2461c
secret_id_num_uses    0
secret_id_ttl         0s
Secrets structure
Now let’s create the Secrets structure in the Vault.
First, an important point. As of this post, the Jenkins plugin for Vault doesn’t work very well with complex secret structures, so I’m going to create just one base and from there, we can create as many folders as we want.
$ vault secrets enable -path=secret kv-v2
Success! Enabled the kv-v2 secrets engine at: secret/
Ok, with the base of the “secret” structure (it could be any name) created and enabled as kv-v2 (Key Value – Version 2), I will now create an internal structure, which I will use for the other secrets, very close to the standard. that we have used in everything so far: secret/infrastructure/jenkins
I will create an item for example, called test-secret01 which will have 2 KV, a username and another pw. Again, it can be whatever you want, url, connection string, token, certificate, with whatever name makes the most sense for your service.
Save the Secret Path… this will be important for creating or changing the user approle policy that we created at the beginning of the post.
$ vault kv put secret/infrastructure/jenkins/test-secret01 username="usr-test01" pwd="1234qwer"

================== Secret Path ==================
secret/data/infrastructure/jenkins/test-secret01

======= Metadata =======
Key                Value
---                -----
created_time       2025-02-03T18:01:02.576993738Z
custom_metadata    <nil>
deletion_time      n/a
destroyed          false
version            1
If you want to take the test:
$ vault kv get secret/infrastructure/jenkins/test-secret01

================== Secret Path ==================
secret/data/infrastructure/jenkins/test-secret01

======= Metadata =======
Key                Value
---                -----
created_time       2025-02-03T18:01:02.576993738Z
custom_metadata    <nil>
deletion_time      n/a
destroyed          false
version            1

====== Data ======
Key         Value
---         -----
pwd         1234qwer
username    usr-test01
Policy
Now with the first structure and secret created, let’s create a read-only policy for the Jenkins approle. In this policy, we will let approle read any structure, KV from secret/infrastructure/jenkins.
Note that in the policy, the path is a little different, there is a “data” right after the secret. This is the complete path that was shown as return when the KV was created.
vault policy write jenkins -<<EOF
path "secret/data/infrastructure/jenkins/*" {
  capabilities = [ "read" ]
}
EOF
The policy can be in an hcl file, it can be incremental and have as many as necessary, for this look for more information on the website https://developer.hashicorp.com/vault/tutorials/get-started/introduction-policies
Validation
That’s enough, if everything was done correctly. But I will show you how to access KV using the approle login, so we can validate if everything was created correctly without any problems.
The first step is to generate a Jenkins approle token so we can log in and test getting the secret.
Remember the role_id and secret_id that was generated at the beginning of this post? At the time of creating the approle, we will need them now. (again later in Jenkins configuration)
$ vault write auth/approle/login role_id=2a89c925-62fc-44b7-fed5-d2de5e31cb69 secret_id=f01e3323-ff2f-849d-e7a1-49805d2300e0

Key                     Value
---                     -----
token                   hvs.CAESICtMurT6A3PY9EXp_FB6tMTgEj_UmpZtR0v8Wziv8oC2Gh4KHGh2cy43UHpPZDVrV3hZcEVSMkNNZHk3Y0t5UjU
token_accessor          wOlXrhF5IJEqlMp3MN79fhKH
token_duration          768h
token_renewable         true
token_policies          ["default" "jenkins"]
identity_policies       []
policies                ["default" "jenkins"]
token_meta_role_name    jenkins-role
With the token, log in to the cli:
vault login hvs.CAESICtMurT6A3PY9EXp_FB6tMTgEj_UmpZtR0v8Wziv8oC2Gh4KHGh2cy43UHpPZDVrV3hZcEVSMkNNZHk3Y0t5UjU
Now do the KV query.
$ vault kv get secret/infrastructure/jenkins/test-secret01

================== Secret Path ==================
secret/infrastructure/jenkins/data/test-secret01

======= Metadata =======
Key                Value
---                -----
created_time       2025-02-03T17:54:53.675205627Z
custom_metadata    <nil>
deletion_time      n/a
destroyed          false
version            1

====== Data ======
Key         Value
---         -----
pwd         1234qwer
username    usr-test01
Jenkins configuration.
Now, let’s start configuring Jenkins for Vault integration.
The first step is to install the HashiCorp Vault plugin on Jenkins

With the plugin installed, we now need to create a Credential in Jenkins with the approle data we created in Vault (beginning of this post). We can do this directly in Manage Jenkins > Credentials or during the plugin configuration, as follows:
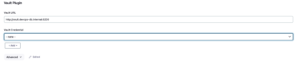
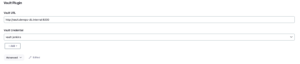
In Manage Jenkins > System look for the Vault Plugin section:
Enter the Vault URL and in Vault Credential, press the Add button
Note that on this screen for adding credentials, there are a series of new types in Kind. As we created an approle in Vault, here in Jenkins we will choose “Vault App Role Credential”.
Enter the Role ID and Secret ID that we have saved since the beginning of the post, when we created the approle in the Vault.
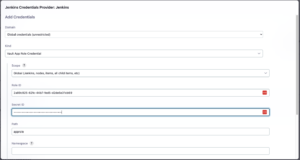
For this credential we gave the ID of vault-jenkins, change it according to what you need.

After that, we have our plugin configured.
Test pipeline.
I’ll leave here a very simple pipeline example, but enough as a starting point for whatever you need from now on.
There is a very important point here.
There are 2 ways to obtain these secrets.
1) Creating a credential in Jenkins that works as a “mapping” for a credential in Vault.
2) Use the credential directly in the Vault.
I prefer this last option and it is the one I will show as an example, for me it doesn’t make sense to have the credentials structure in Jenkins, even as a mapping, if I am already creating it in Vault.
https://github.com/faustobranco/devops-db/tree/master/infrastructure/pipelines/tests/vault
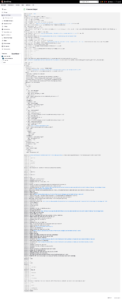
The pipeline calls withVault, informing the parameters configured at the beginning of the file, such as path, which KVs will be read, which environment variables will be used, url, credentials, etc.
@Library('devopsdb-global-lib') _

import devopsdb.utilities.Utilities
def obj_Utilities = new Utilities(this)

def secrets = [[path: 'secret/infrastructure/jenkins/test-secret01', engineVersion: 2, secretValues: [[envVar: 'var_username', vaultKey: 'username'],[envVar: 'var_pwd', vaultKey: 'pwd']]]]

def configuration = [disableChildPoliciesOverride: false, skipSslVerification: true, timeout: 60, vaultCredentialId: 'vault-jenkins', vaultUrl: 'http://vault.devops-db.internal:8200']

pipeline {
    agent {
        kubernetes {
            yaml GeneratePodTemplate('1234-ABCD', 'registry.devops-db.internal:5000/ubuntu_ansible:2.16.8')
            retries 2
        }
    }
    options { timestamps ()
        skipDefaultCheckout(true)
    }
    stages {
        stage('Script') {
            steps {
                container('container-1') {
                    withVault([configuration: configuration, vaultSecrets: secrets]) {
                        sh 'echo $var_username > sys-user-account.txt'
                        sh 'echo $var_pwd >> sys-user-account.txt'
                        sh 'env'
                        sh 'echo ${username}'
                        sh 'echo ${pwd}'
                    }
                sh 'sleep 10m'
                }
            }
        }
    }
}
In this example, I use the created approle credential, so I will only be able to read the credentials in the structure configured in the policy.
I also show that when you print these variables, they are protected, as they should be. But I print it to a file, to simulate any normal use and I leave a 10-minute sleep on purpose, so that they enter the POD and take a look at the file.
root@infrastructure-pipelines-tests-vault-tests-34-xhx7m-52j6n-s1rzq:/home/jenkins/agent/workspace/infrastructure/pipelines/tests/vault-tests# cat sys-user-account.txt

usr-test01
1234qwer