Vault – Installation
After some time with a break in posting, for personal reasons, I am continuing with the project. In this post, another service that is essential for infrastructure / DevOps. Vault, in our case Hashicorp Vault, but there are so many others, including cloud providers offering their own services.
What makes me choose Vault is how simple it is to use. To this day, it is the most used and well-known tool, it is safe and has a lot of material on the web for research.
This first step, I will only do the installation, without using a Backend database or ssl protocol, we will see this in future posts.
I created a simple VM, with only 1Gb of memory, for testing purposes. https://github.com/faustobranco/devops-db/tree/master/vault
Following the project standards, I set the IP to 172.21.5.157 and the DNS to vault.devops-db.internal/ . (https://devops-db.com/some-observations/ and https://github.com/faustobranco/devops-db/blob/master/bind9/config/devops-db.internal)
Installation
Our installation will be done on Ubuntu, so the first step is to add the Hashicorp repository. Then install the vault package.
wget -O - https://apt.releases.hashicorp.com/gpg | sudo gpg --dearmor -o /usr/share/keyrings/hashicorp-archive-keyring.gpg

echo "deb [arch=$(dpkg --print-architecture) signed-by=/usr/share/keyrings/hashicorp-archive-keyring.gpg] https://apt.releases.hashicorp.com $(lsb_release -cs) main" | sudo tee /etc/apt/sources.list.d/hashicorp.list

sudo apt update && sudo apt install vault
Next, for testing purposes, we will initially create our Vault without HTTPS, for this, we have to change the configuration file /etc/vault.d/vault.hcl, commenting out the https listener section, enabling http listener and changing the address .
Example:
vi /etc/vault.d/vault.hcl

# HTTP listener
listener "tcp" {
  address = "0.0.0.0:8200"
  tls_disable = 1
}

# HTTPS listener
#listener "tcp" {
#  address       = "0.0.0.0:8200"
#  tls_cert_file = "/opt/vault/tls/tls.crt"
#  tls_key_file  = "/opt/vault/tls/tls.key"
#}
The Vault package does not include a service (systemctl) so that it can run in the background, so we will create one.
sudo tee /lib/systemd/system/vault.service <<EOF
[Unit]
Description="HashiCorp Vault"
Documentation="https://developer.hashicorp.com/vault/docs"
ConditionFileNotEmpty="/etc/vault.d/vault.hcl"

[Service]
User=vault
Group=vault
SecureBits=keep-caps
AmbientCapabilities=CAP_IPC_LOCK
CapabilityBoundingSet=CAP_SYSLOG CAP_IPC_LOCK
NoNewPrivileges=yes
ExecStart=/usr/bin/vault server -config=/etc/vault.d/vault.hcl
ExecReload=/bin/kill --signal HUP
KillMode=process
KillSignal=SIGINT

[Install]
WantedBy=multi-user.target
EOF

sudo chmod 644 /lib/systemd/system/vault.service
sudo systemctl daemon-reload
Now we can start the service.
systemctl start vault.service
systemctl status vault.service
First settings.
The first thing to do is get the keys to unseal the Vault. The concept of sealing the vault is explained on the page itself. https://developer.hashicorp.com/vault/docs/concepts/seal
To unseal, you need 3 of the keys below, in any order. So keep these keys safe.
To obtain the admin token and badges:
$ vault operator init

Unseal Key 1: +s2SmT8nEKICbj+PqxFbE8IVKab2F+u6anYNVJ5bO/zn
Unseal Key 2: i4muUG8rwp4rqrlKJ5W2dB9sIMMLWSBzJB9CgozbwQpL
Unseal Key 3: YyTGNgxJf/teaLqkArd5aZfMqFQU/y5PtgfCb5QgIWHF
Unseal Key 4: YEf02CEcjDdrr8t3tTJBN8HYt3f1UmWxznvnOOtSq+yg
Unseal Key 5: q5T2JYNLeiRupggWb6u09a94TogJa9uxs1rl7eaL56kZ

Initial Root Token: hvs.HhrZWTMU4F8lCkBmTVmjcHVj

Vault initialized with 5 key shares and a key threshold of 3. Please securely
distribute the key shares printed above. When the Vault is re-sealed,
restarted, or stopped, you must supply at least 3 of these keys to unseal it
before it can start servicing requests.

Vault does not store the generated root key. Without at least 3 keys to
reconstruct the root key, Vault will remain permanently sealed!

It is possible to generate new unseal keys, provided you have a quorum of
existing unseal keys shares. See "vault operator rekey" for more information.
Now let’s proceed with the unseal, doing a login test before and after.
$ vault operator unseal
Unseal Key (will be hidden):
Key                Value
---                -----
Seal Type          shamir
Initialized        true
Sealed             true
Total Shares       5
Threshold          3
Unseal Progress    1/3
Unseal Nonce       eb76566f-6b39-d2cc-93d4-b8372577255b
Version            1.18.4
Build Date         2025-01-29T13:57:54Z
Storage Type       file
HA Enabled         false
Login Test, not necessary, just to demonstrate how it works:
$ vault login hvs.HhrZWTMU4F8lCkBmTVmjcHVj
Token (will be hidden):
Error authenticating: error looking up token: Error making API request.

URL: GET http://127.0.0.1:8200/v1/auth/token/lookup-self
Code: 503. Errors:

* Vault is sealed
Let’s finish unsealing the other 2 remaining keys.
$ vault operator unseal
Unseal Key (will be hidden):
Key                Value
---                -----
Seal Type          shamir
Initialized        true
Sealed             true
Total Shares       5
Threshold          3
Unseal Progress    2/3
Unseal Nonce       eb76566f-6b39-d2cc-93d4-b8372577255b
Version            1.18.4
Build Date         2025-01-29T13:57:54Z
Storage Type       file
HA Enabled         false

$ vault operator unseal
Unseal Key (will be hidden):
Key             Value
---             -----
Seal Type       shamir
Initialized     true
Sealed          false
Total Shares    5
Threshold       3
Version         1.18.4
Build Date      2025-01-29T13:57:54Z
Storage Type    file
Cluster Name    vault-cluster-b982bc3c
Cluster ID      47bd9771-5c22-1bfd-6f73-10c9ce91902b
HA Enabled      false
Now, we log in.
$ vault login hvs.HhrZWTMU4F8lCkBmTVmjcHVj

Success! You are now authenticated. The token information displayed below
is already stored in the token helper. You do NOT need to run "vault login"
again. Future Vault requests will automatically use this token.

Key                  Value
---                  -----
token                hvs.HhrZWTMU4F8lCkBmTVmjcHVj
token_accessor       fQgnMRHecPC86CBMti6P1kHh
token_duration       ‚àû
token_renewable      false
token_policies       ["root"]
identity_policies    []
policies             ["root"]
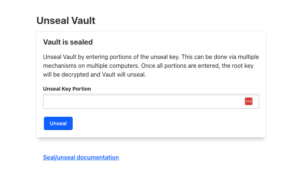
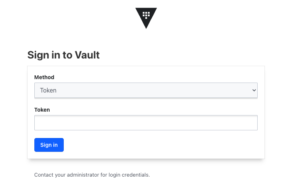
With that done, the WEB-UI should also be ready to use.
http://127.0.0.1:8200/
Or in our case: http://vault.devops-db.internal:8200/ui/
The procedure is the same, you must unseal and then login.