In this post, I will show how to configure SSH keys between GitLab and Jenkins, to facilitate script checkout and make the connection more secure, so we stop using http and use SSH (git@gitlab.devops-db.internal :…)
As an example of use, I will leave a piece of pipeline that checks out (downloads) a Git repository, this makes it a lot easier, I will use this very frequently from now on, downloading codes, Pythons, Java, Ansible, Terraform, etc. from GitLab and run the pipeline.
The way I’m going to leave it here works very well for projects with few codes, as it does the complete checkout. For large projects, it’s worth doing the Sparce Checkout.
SSH Keys.
First point, we need to create a set of SSH keys (Private and Public), there are thousands of examples on the net of how to generate this on Linux and Windows, to make it easier, I use this website: https://8gwifi.org/sshfunctions.jsp
Choose RSA, 2048 and no Passphrase. Keep the Private and Public keys well.
Gitlab Configuration.
With the keys created, we need to register the Private Key with the GitLab user. In this example, I will use the user I created in LDAP for this Jenkins integration with Gitlab: usr-service-jenkins.
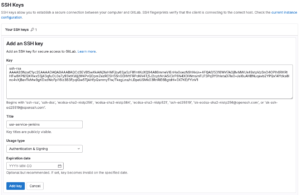
I log in with the user, click Edit profile and in the menu on the left, SSH Keys. When the screen with the list of created SSH Keys appears (as it was the first time, there was nothing), click Add new key.
Copy the Public Key you created to the Key box. Give the key a name, for the test environment I remove the expiration date.

Jenkins Configuration.
Now with the key created in GitLab, let’s configure Jenkins. First, we have to create a Credential to place the Private Key we created above.
With an administrative account, open Manage Jenkins, Credentials.
There will be a list of credentials created and a Store Scoped to Jenkins item, load it into the Store name, in this case System.

Then, click on the domain where you will register the credential, normally it is Global credentials.

The next screen is a list of credentials registered in this Domain, click on “+ Add Credentials”.
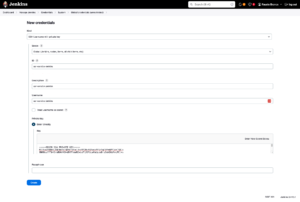
In Kind, choose: SSH Username with private key.
Scope: It must be the same as the one you chose in the Credentials Screen (two images above).
ID: You can leave it blank and Jenkins generates an ID (UUID), but I prefer to leave a name that I remember, as this name (ID) is what will be referenced from now on, in codes or configurations.
Usename: The GitLab user you used to “create” this key. The configuration we made in the topic “Gitlab Configuration.” right up.
In Private Key, select the Enter directly option and in the text field that will open, copy the content of the Private Key that you created.
Pay attention that the combination of the Private Key configured in Jenkins and the Public Key configured in GitLab must be the same as the one you created, no other combination will work.
Leave the Passphrase blank (We created it like this at the beginning of this Post).
Click Create.

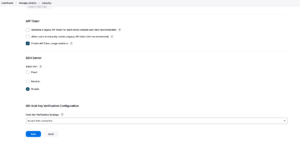
There is one more security configuration that needs to be done. There is a Git Host Key Validation option. By default, it is configured with “Known hosts files”.
To make these accesses to GitLab, there is nothing more than the SSH protocol, and Linux-based systems have a validation of these Keys when we do an SSH, for those who are familiar, it is the file located in the home page: ~/.ssh/known_hosts .
If we try to run the pipeline now, no matter how configured everything is, the chance of failure is high. With this configuration active, we would have to SSH into the host where Jenkins is installed and with User jenkins, run an ssh, git ls-remote or ssh-keyscan against the GitLab host, something like this:
root@srv-infrastructure-jenkins-master-01:/home/vagrant# su jenkins

jenkins@srv-infrastructure-jenkins-master-01:/home/vagrant$ cd ~
jenkins@srv-infrastructure-jenkins-master-01:~$ mkdir .ssh
jenkins@srv-infrastructure-jenkins-master-01:~$ ssh-keyscan -t rsa gitlab.devops-db.internal >> ~/.ssh/known_hosts
# gitlab.devops-db.internal:22 SSH-2.0-OpenSSH_8.9p1 Ubuntu-3ubuntu0.7

jenkins@srv-infrastructure-jenkins-master-01:~$ cat .ssh/known_hosts
gitlab.devops-db.internal ssh-rsa AAAAB3NzaC1yc2EAAAADAQABAAABgQCdiGcC0D1ZpHmPtL1O+Gm3aQoj04VrocYo094s4zfkj0ut3Iqc/F4whIMOQ3PEteWVafuo8v7libp7bvw/uhFadHl+Li4knlL7xpLmWv5upo69vkWM5KIEQ1fYT5ShUdJM+ORzbhnkehjHII5CJNuHUCITo85APqLiuxRqiGC+8UThO8a10+aEyRB4PQCTcLWQYi0qkzqdETxRN7TLKkRaPlUwUyhLoXXzHw2PUJyzEBVCEbxeunIDeZWH34qsjXeqOww291Bg1euTJugixyHx4y4My1xsij7IO/fQSGjjUtMjI536saXzj3/wxzk5MywTGbpCxn31l/WhGc0M710MCqJq4TPE5QesOlhse2jm9YHCwlI20kLooNpIUG1kMCj74LrGlBmCNNUVvDR93RSCNB9UeoTqExTGaasfgayun75qFeJqDaSL5rba0B8iKqtUnCsQgtqgcwIa9Qf6ePv+05CmHIK0gEm5sSMSIJ/f8vwVfrvaJC9W+MzAYxK6F+U=
root@b31bd131e02f:/# su jenkins
jenkins@b31bd131e02f:/$ cd ~
jenkins@b31bd131e02f:/$ ssh-keyscan -t rsa gitlab.devops-db.internal >> ~/.ssh/known_hosts

jenkins@b31bd131e02f:~$ cat .ssh/known_hosts
|1|YtbvzUyTLYAx5g1/PXf75TizBOU=|J0NQBwZ3az48yh5MTibQGxSVOAg= ssh-ed25519 AAAAC3NzaC1lZDI1NTE5AAAAIOe2e5J6BFoQMgT81KCy6sR5j6s0WraJEfdRJn2u8WqA
gitlab.devops-db.internal ssh-rsa AAAAB3NzaC1yc2EAAAADAQABAAABgQDbOOSqgx2wn3jwo3oeZ5aetbf2DO9X8WPGXcFUnx2HSTvoJk/1AuCJ3+acN3hogKz8FIuuIW4+JlmDymHt9A8L9Vab6J9VecmltC7Js9XiwONhS03R/saE3GecOFOhGLvaBdWomYX90pXdVed5rkBaz26uMM+QWrgEhqdlGN59O2110vV732PI8lxXZM/t2mTqhXVZ1ElohAbr0Ip2RMDok8FM6hG3XsBKPCGybNus0Vsw4m2DQjWV6ui3a1Lz6Vq+JPkcC7CYysrfcpt/mjLs6UOf/UgV8aWRVKQ6HwhG7tPAw9STQy7+ugpN2+WBerCxciREQWNuXTCWM6XSsUV9E6cwkICxL+qb9k0F0/iRpImaBdWAMiarV8PQm8deii+6hNVEvVLG8hOJkrPSz34kuuvXwi4Iq7c+vtCGm+gBCZtXRctdQsT3xG/jAFfiVjHgEzAgRrs8ZwJuOEtMohRfIBd8D+CuN9GTBVRApwPT9mrcXRkkvOOefMP0snVcjPk=
This has to be done manually whenever the GitLab host changes, it is safer, but it is more work.
Another option is to leave it a little more open, which is to change the option to Accept first connection, which makes this “accept” of the host key on the first connection you make with a host.

Depending on how this credential is registered in GitLab, it can even be used in the configuration in GitLab connections (Manage Jenkins / System / GitLab).
Pipeline.
Now let’s do a simple test, validate whether a Groovy script in a pipeline can checkout a project in GitLab.
It’s really a simple test, I’m not going to put the pipeline script in GitLab nor am I going to create a Shared Library with the Checkout code.
Pipeline:
pipeline {
    agent {
        docker {
            image 'registry.devops-db.internal:5000/ubuntu_python:3.10.6'
            label 'docker'
            args '-u root'
        }
    }
    options { timestamps ()
              skipDefaultCheckout(true)
            }
    stages {
        stage('Source') {
            when { not { changeRequest() } }
            steps {
                git branch: 'master',
                    credentialsId: 'usr-service-jenkins',
                    url: 'git@gitlab.devops-db.internal:infrastructure/pipelines/dns.git'
            }
        }
        stage('Validation') {
            steps {
                sh 'ls -lah ${WORKSPACE}'
            }
        }
        stage('Build') {
            steps {
                sh 'sleep 10m'
            }
        }
        stage('Cleanup') {
            steps {
                cleanWs deleteDirs: true, disableDeferredWipeout: true
                updateGitlabCommitStatus name: 'Cleanup', state: 'success'
            }
        }
    }
}
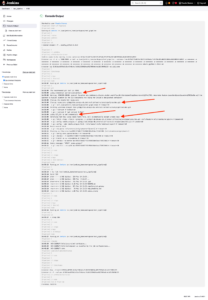
In this pipeline, at the “Source” stage, I then checkout the project “infrastructure/pipelines/dns.git” using the credential we created above, in Jenkins and indicate that I want the “master” branch.
In the “Validation” stage, I just do an ls -lah to show that the files are really there.
In “Build“, I take a 10-minute break, on purpose, so that I can enter the Docker container that this pipeline created and do my validations and tests manually.
Log at the end, and very important, clean the workspace, or the codes will stay there for some time and this can cause performance problems and lack of space.

Leave a Reply