Jenkins – Shared Libraries
In this post, I want to show you how to use the Shared Libraries feature in Jenkins. In short, you can create libraries / classes in Groovy and use them in pipelines. This greatly expands the possibilities and resources of your pipelines, creating customized code and being able to use it helps a lot, code reuse is fundamental, collaborative development, easy control and maintenance, etc, etc, etc.
These Shared Libraries are configured globally, they can be shared between all Pipelines and not just one, but you can create several Shared Libraries entries and import only the one you want to use in your Groovy code in a pipeline.
Another important point is that these Shared Libraries are versioned in Git (GitHub or GitLab), which is safer and more practical.
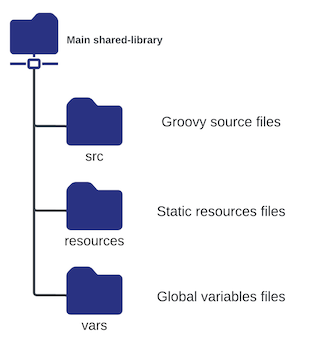
The structure you must follow is simple, basically 3 folders:
| Folder | Description |
|---|---|
| src | src is where exactly you should have your Groovy Class, the subfolder structure within src is the same structure that you will use to import the code, this will become clearer in practice later. This directory is added to the classpath when executing Pipelines. This directory is added to the classpath when executing Pipelines. |
| resources | resource is where you should place all files that are static and not scripts or variables, for example image files, pythons, json, yaml, csv, etc, etc, etc. |
| vars | The vars directory hosts script files that are exposed as a variable in Pipelines. The name of the file is the name of the variable in the Pipeline. So if you had a file called vars/log.groovy with a function like def info(message)… in it. |
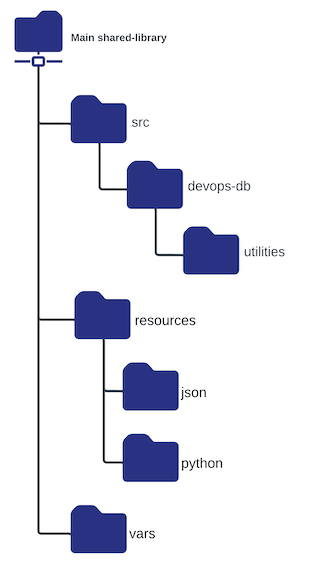
An example of what it might look like:
Scripts and GitLab.
To do this, I will create a project in GitLab in the structure: infrastructure / pipelines / lib-utilities to be able to create all the libraries that will be truly global. (http://gitlab.devops-db.internal/infrastructure/pipelines/lib-utilities)
I’ll create the structure as above, but I won’t create anything in resources for now. For this example, just a lib to create a folder and a “vars” to generate a password. https://github.com/faustobranco/devops-db/tree/master/infrastructure/lib-utilities
I’m going to show you two ways to use Shared Libraries, using the src folder structure, which I prefer because it allows you to create much more complex structures, and vars, which is simpler and for small methods that don’t require much complexity.
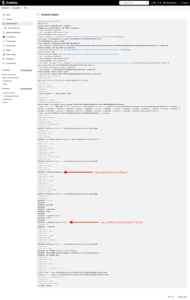
/src/devopsdb/utilities/Utilities.groovy:
/**
 * Example code for configuring a Shared Library in Groovy for Jenkins.
 * @author fauso.brancp
 * @author https://devops-db.com/
 * @version 1.0
 * @since   2024-05-09
*/
package devopsdb.utilities

class Utilities implements Serializable {

  def obj_Pipeline_Context
  def Utilities(obj_Context) {
    obj_Pipeline_Context = obj_Context
  }
  def CreateFolders(String str_structure){
    /**
    * Method for creating folder structures.
    * @param str_structure String - Full path of the folder structure to be created..
    * @return Nothing.
    * @exception IOException On input error.
    * @see IOException
    */
    if (str_structure.isEmpty()) {
      throw new Exception("str_structure parameter is Empty");
    }
    File directory = new File(str_structure);
    if (! directory.exists()){
      directory.mkdirs();
    }
  }
}
/vars/GeneratePassword.groovy:
def call(int int_Length, boolean bol_SpecialChar){
    /**
     * Method for generating Random passwords, with or without special characters.
     * @param int_Length int - Password length in characters.
     * @param bol_SpecialChar booleal - Does it include special characters?
     * @return String with the generated password.
     * @exception IOException On input error.
     * @see IOException
     */
    def lst_SpecialChar = ['!','@','#','$','%','&']
    def lst_Chars = ['a'..'z', 'A'..'Z', 0..9, '_'].flatten();
    Random rand = new Random(System.currentTimeMillis());
    if (bol_SpecialChar) {
        lst_Chars = lst_Chars + lst_SpecialChar;
    }
    def lst_PasswordChars = (0..int_Length - 1).collect { lst_Chars[rand.nextInt(lst_Chars.size())] };
    def str_RandomPassword = lst_PasswordChars.join('');
    return str_RandomPassword
}
The structure in the repository looked like this:
.
├── resources
├── src
│   └── devopsdb
│       └── utilities
│           └── Utilities.groovy
└── vars
    └── GeneratePassword.groovy
Jenkins configuration.
Now, with the structure created in GitLab, let’s configure this Shared Library in Jenkins.
First, with an administrative account, open the System option in Manage Jenkins. Then search for Global Pipeline Libraries.

Press the Add button and a list of options will be shown.
The Library Name will be the same as the one you import into your Pipeline script.
Default version, usually the Git branch the script is in, but it can be a label, commit hash, etc.
Further below, you must enter the URL of your Shared Library project in Git and also the access credentials.
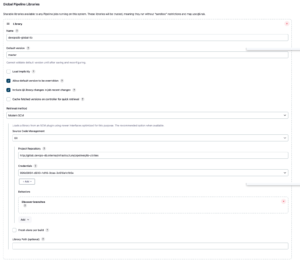
Save the configuration by clicking the Save button at the bottom of the page.
Pipeline Example.
Now let’s use any pipeline to load this library, execute both methods and validate the result.
So, I’m going to make two calls, the first is the script that is in src, which has a class, with the CreateFolders method. The second is the script that is in vars, which is “treated” as a variable and only has the call method, which is actually the result of the GeneratePassword (same name as groovy file) call.
Some points.
To load all vars files, the “_” character at the end of the @Library line works.
Just below @Library, you need to import the class you created in src. Instantiating the class is up to you, wherever it makes the most sense for you in the code.
@Library('devopsdb-global-lib') _

import devopsdb.utilities.Utilities
def obj_Utilities = new Utilities(this)

pipeline {
    agent {
        docker {
            image 'ubuntu_python:3.10.6'
            label 'docker'
            args '-u root'
        }
    }
    options { timestamps ()
              skipDefaultCheckout(true)
            }
    stages {
        stage('Example_src') {

            steps {
                script {
                    def str_folder = "${env.WORKSPACE}/NewFolder/Level1/Level2"
                    println(str_folder)
                    obj_Utilities.CreateFolders(str_folder)
                }
            }
        }
        stage('Example_vars') {
            steps {
                script {
                    def str_Password = GeneratePassword(20, true)
                    println(str_Password)
                }
            }
        }
        stage('Validate') {
            steps {
                sh 'ls -R'
                sh 'sleep 10m'
            }
        }
        stage('Cleanup') {
            steps {
                cleanWs deleteDirs: true, disableDeferredWipeout: true
            }
        }
    }
}
Node that at the beginning of the Script I import the Library that we configured in Jenkins and right below I import the full path of the groovy file. And then, I instantiate the class.
In the Build stage, I concatenate a variable with the name of the folder I want to create and call the method from our lib.
In the Validity stage, the 10-minute sleep is intentional, so I can access the container and validate the creation of the folder.
docker container ls
CONTAINER ID   IMAGE                  COMMAND                  CREATED         STATUS         PORTS                                                                                      NAMES
44e3f605176d   ubuntu_python:3.10.6   "cat"                    8 seconds ago   Up 6 seconds                                                                                              heuristic_thompson

docker exec -it -u root --privileged heuristic_thompson /bin/bash

root@44e3f605176d:/var/jenkins_home/workspace/test_pipeline# cd /var/jenkins_home/workspace/test_pipeline@2
root@44e3f605176d:/var/jenkins_home/workspace/test_pipeline@2# tree
.
`-- NewFolder
    `-- Level1
        `-- Level2