Jenkins – Agents in Kubernetes.
Hello! In this post, I want to show another step in using and configuring Jenkins in this project.
Use a Kubernetes cluster as a Jenkins Agent. Here with an important point, Jenkins Master is installed on a VM and not on Kubernetes.
When finishing the Jenkins x Kubernetes agent configurations described in this post, I recommend reading post Jenkins – Pods, Containers and Pipelines and Jenkins – Shared Libraries, Containers and Manifests., which describes how PODs and Containers work in Pipelines.
Initially I used the configuration and a minikube to simulate Kubernetes, this solution did not suit me. Minikube uses a VM and within this VM a Docker to simulate K8s, that is, this would become a Docker inside a VM, inside another VM, this changes a lot in terms of configuration, performance, accessibility, etc.
So I redid the K8 environment and used MicroK8s.
The Image used in this example is in our Registry and the post that shows how to create it in: Kubernetes – Base image for Jenkins Agent
Kubernetes.
The installation was done with snap, normally, but there are some configuration steps that I will leave below.
MicroK8s creates a CA to generate certificates (/var/snap/microk8s/current/certs/) and these certificates are generated according to DNS and IPs that are in the file /var/snap/microk8s/current/certs/csr.conf.template, so we have to change the file and add the IP and DNS (soon) of the VM where MicroK8s was installed and regenerate the certificates.
Microk8 is on my main server, so it has IP 76, so add one or as many DNS.X and IP.X sequences as you need.
[ alt_names ]
DNS.1 = kubernetes
DNS.2 = kubernetes.default
DNS.3 = kubernetes.default.svc
DNS.4 = kubernetes.default.svc.cluster
DNS.5 = kubernetes.default.svc.cluster.local
IP.1 = 127.0.0.1
IP.2 = 10.152.183.1
IP.3 = 172.21.5.76
IP.4 = 10.0.2.15
Right after saving the file, we will regenerate the certificates.
sudo /snap/bin/microk8s stop
sudo /snap/bin/microk8s refresh-certs --cert server.crt
sudo /snap/bin/microk8s start
The next step is whether you use a DNS in your environment, in my case, I have one that we created in another post (BIND) and so we have to configure Microk8s to use it.
To do this, edit the file /var/snap/microk8s/current/args/kubelet and add/change the cluster-dns line with the DNS server.
sudo vi /var/snap/microk8s/current/args/kubelet

--cluster-dns=172.21.5.155
Enable the microk8s rbac addon (https://microk8s.io/docs/multi-user).
microk8s enable rbacAn important point, the images we will use, are in our internal Registry (Registry – Docker images). Therefore, we need to configure MicroK8s to allow pulling images from insecure repositories. Or all PODs will fail by ImagePullBackOff.
Remember, our Registry has the DNS: registry.devops-db.internal:5000
So, we have to create a folder with the name: Registry port within the MicroK8s certificate structure and create a file with the settings below:
sudo mkdir -p /var/snap/microk8s/current/args/certs.d/registry.devops-db.internal:5000
sudo vi /var/snap/microk8s/current/args/certs.d/registry.devops-db.internal:5000/hosts.toml
hosts.toml
server = "http:/registry.devops-db.internal:5000"

[host."http://registry.devops-db.internal:5000"]
capabilities = ["pull", "resolve"]
Restart MicroK8s:
microk8s stop
microk8s start
With this, K8s should now be able to pull images from our Registry. To do the test, simply create any POD.
kubectl run mytest --image=registry.devops-db.internal:5000/img-jenkins-devopsdb:2.0Cluster on MicroK8s:
$ kubectl cluster-info
Kubernetes control plane is running at https://127.0.0.1:16443
CoreDNS is running at https://127.0.0.1:16443/api/v1/namespaces/kube-system/services/kube-dns:dns/proxy

To further debug and diagnose cluster problems, use 'kubectl cluster-info dump'.

$ kubectl get nodes
NAME                                   STATUS   ROLES    AGE   VERSION
srv-infrastructure-microk8-master-01   Ready    <none>   10h   v1.29.4
Create the environment.
Namespace
Now, let’s start creating the environment in K8s so that Jenkins can create the necessary Pods.
All manifests are in our git: https://github.com/faustobranco/devops-db/tree/master/jenkins/k8-agent
Start by creating the namespace:
$ kubectl create namespace jenkins-devopsdb
namespace/jenkins-devopsdb created
Service Account
Next, we will create a serviceAccount for Jenkins, it will be used when the K8 server is ready. https://github.com/faustobranco/devops-db/blob/master/jenkins/k8-agent/serviceAccount.yaml
$ kubectl apply -f serviceAccount.yaml
clusterrole.rbac.authorization.k8s.io/jenkins-admin created
serviceaccount/jenkins-admin created
clusterrolebinding.rbac.authorization.k8s.io/jenkins-admin created
Service Account Token
In Kubernetes >1.24, ServiceAccount token secrets are no longer automatically generated. Therefore, we will need to generate a token manually, it will be used, below, in the Jenkins configuration so that you can access the API and control the environment.
But these tokens have a validity, usually very short, of 1 hour. Which, of course, is unfeasible for this use.
There is the option of Long-lived API token for a ServiceAccount, which has been discouraged for security reasons, but it is still an option. And it is nothing more than a Secret for the ServiceAccount.
Another option is to create a Token with a longer expiration date, for example 1 year, but this involves greater control and maintenance.
The option you use is your decision and what best fits your needs.
The two ways are described below.
Create the Token with a duration of 1 year (8766h).
kubectl create token jenkins-admin --namespace jenkins-devopsdb --duration=8766h --output yamlSee two important pieces of information in the result: expirationTimestamp, which indicates one year from now.
token: This information is what will be used further down in the Jenkins configuration.
apiVersion: authentication.k8s.io/v1
kind: TokenRequest
metadata:
  creationTimestamp: "2024-06-20T11:03:04Z"
  name: jenkins-admin
  namespace: jenkins-devopsdb
spec:
  audiences:
  - https://kubernetes.default.svc
  boundObjectRef: null
  expirationSeconds: 31557600
status:
  expirationTimestamp: "2025-06-20T17:03:04Z"
  token: eyJhbGciOiJSUzI1NiIsImtpZCI6IkRvX2w2anFteE5WaWxTZHg0U1RUZUk3ZnB6X1VHSlJ1U05CRmlDZzA2RGsifQ.eyJhdWQiOlsiaHR0cHM6Ly9rdWJlcm5ldGVzLmRlZmF1bHQuc3ZjIl0sImV4cCI6MTc1MDQzODk4NCwiaWF0IjoxNzE4ODgxMzg0LCJpc3MiOiJodHRwczovL2t1YmVybmV0ZXMuZGVmYXVsdC5zdmMiLCJrdWJlcm5ldGVzLmlvIjp7Im5hbWVzcGFjZSI6ImplbmtpbnMtZGV2b3BzZGIiLCJzZXJ2aWNlYWNjb3VudCI6eyJuYW1lIjoiamVua2lucy1hZG1pbiIsInVpZCI6Ijg0MGFiY2I2LTI3OTMtNGUwNi05YjlkLTU4NTJlOWI0MzU0ZSJ9fSwibmJmIjoxNzE4ODgxMzg0LCJzdWIiOiJzeXN0ZW06c2VydmljZWFjY291bnQ6amVua2lucy1kZXZvcHNkYjpqZW5raW5zLWFkbWluIn0.m9s3xSv-CgyZrkofHKcY3l9TcwZfCcKUJB5wWKkux4GDQgFZMCY-P9zoCcnHxndndGo9VjZl_hPYOF4ZNLbZjbAHZUdXjMEXUDeOV4QNwbd0BUyqHoYk9SbTNxqwNxWN9Oeag6RdBwqcZT-TD04lo0yOtjEDGGDfP84I2NbOHFuX-dD7BiAIi1RJA4KUrPiak1kTY49_x71B8FO951tIL5GIxGmt5kvStATiQ8_f17WFMTstYjHHT2IfNfCHDOS7k38cuqz8KoXvvglDDgH9583Ae48jUU365PYHZiLOOIBU-YNE7Jsu24qdUV_-rxipEZ2GK-qbsm6ItY789vvrIg
To create a Long-Lived token, create the secret-token.yaml manifest file.
$ vi secret-token.yaml

apiVersion: v1
kind: Secret
metadata:
  name: jenkins-admin
  annotations:
    kubernetes.io/service-account.name: jenkins-admin
type: kubernetes.io/service-account-token
Apply it
$ kubectl apply -f secret-token.yaml --namespace jenkins-devopsdb
secret/jenkins-admin created
See the result, there is no expiration date. But don’t directly use the contents of the Token field, it needs to be decoded.
$ kubectl get secret/jenkins-admin --namespace jenkins-devopsdb --output yaml

apiVersion: v1
data:
  ca.crt: LS0tLS1CRUdJTiBDRVJUSUZJQ0FURS0tLS0tCk1JSUREekNDQWZlZ0F3SUJBZ0lVWEJveUZ1WTcyZHJpK1ZoTWNtZ2NpTHR6eWw4d0RRWUpLb1pJaHZjTkFRRUwKQlFBd0Z6RVZNQk1HQTFVRUF3d01NVEF1TVRVeUxqRTRNeTR4TUI0WERUSTBNRFl4T1RJek1EazFOMW9YRFRNMApNRFl4TnpJek1EazFOMW93RnpFVk1CTUdBMVVFQXd3TU1UQXVNVFV5TGpFNE15NHhNSUlCSWpBTkJna3Foa2lHCjl3MEJBUUVGQUFPQ0FROEFNSUlCQ2dLQ0FRRUF2SFlSb2kwUDdpaVJiUzUxcU9HV3lZSlFNL0JETW5QYXNnamYKWFpTZU9KSjVWR3YrbXRnQVRHTHJmQk9UVzVSSTBndGRoWGlJRmFlVTR5V09xa3M5NEdjNjNhR1hiVGtKdGFRQgpkbzd6R0NTRTJLWVdDT1kyRGc5am5ySHRMYjAzMHh0cmlqa2piOEJrdHAzNVpMS09QYWJqOTZNLzhZQlcrVXlTClAwcVNwbEtzRXd0cnNMUDhjMGFyWG1OamN0MFVQRkdUT0V6TjREZWN6M0o3NTl6NldrUWU3c1RIRzdXOVNEaEYKNG4za0JJc0ZYYmVINkh0MTR6eTZveE94ZkVtb2R4VTNUcmxGVWFtZElOajhQZmlOakQrcFpHTEZqN25sR0ovaApuamFrN05oSnRlYS8rTUhpT1NTdlVlS3VpR29lUUQ2SUQ1R1k1cjdNMVFTNUY4ZUhtUUlEQVFBQm8xTXdVVEFkCkJnTlZIUTRFRmdRVWhLNlZzQkVYMm5JM0NKbzFKck9wRmZWZ0Jaa3dId1lEVlIwakJCZ3dGb0FVaEs2VnNCRVgKMm5JM0NKbzFKck9wRmZWZ0Jaa3dEd1lEVlIwVEFRSC9CQVV3QXdFQi96QU5CZ2txaGtpRzl3MEJBUXNGQUFPQwpBUUVBTVJFalBHSWk0MUtuU3ZjUFYxT0w1MUpod3RSTVBWQWFIZVU0cDhKTXBWc2EwSjRkRjByaTgybVVDYXpTCkFKOCtDdlZwaVZqZDFZUXRqYWhQaXIwa3d5b2FWL3J1MGFqa2lwUGR1ZStpdHAvUkZacmEzZHAzWjcvdGxXeXcKcmZVclhpcnhnOHdKMW5nUWI4SXFlM2NVVllOdEErK2tEVnllbWJNM01HUjlrbHhjQm5LaUFsSnBKNE5QVXpEQQp2TlpqcUJCTCtFdDFieGgwWGwwTXhEL1Fia09SN0V1eDkyN0lzcStVUFhVWnpZWlo0RTFMUFJ0dmVtYTFwcXlTCllUakE3TnJJZ1BkV0UrT2JqbExnYmZXdkxEbHhDVEFrdjJ3UHpPYTdNZ2E3TmlJUmRURzFyYjMvTU1OYVhQTE0Kb2Z1emZRZERvaGVaeXBlaW1OeTgzMnhZT1E9PQotLS0tLUVORCBDRVJUSUZJQ0FURS0tLS0tCg==
  namespace: amVua2lucy1kZXZvcHNkYg==
  token: ZXlKaGJHY2lPaUpTVXpJMU5pSXNJbXRwWkNJNklrUnZYMncyYW5GdGVFNVdhV3hUWkhnMFUxUlVaVWszWm5CNlgxVkhTbEoxVTA1Q1JtbERaekEyUkdzaWZRLmV5SnBjM01pT2lKcmRXSmxjbTVsZEdWekwzTmxjblpwWTJWaFkyTnZkVzUwSWl3aWEzVmlaWEp1WlhSbGN5NXBieTl6WlhKMmFXTmxZV05qYjNWdWRDOXVZVzFsYzNCaFkyVWlPaUpxWlc1cmFXNXpMV1JsZG05d2MyUmlJaXdpYTNWaVpYSnVaWFJsY3k1cGJ5OXpaWEoyYVdObFlXTmpiM1Z1ZEM5elpXTnlaWFF1Ym1GdFpTSTZJbXBsYm10cGJuTXRZV1J0YVc0aUxDSnJkV0psY201bGRHVnpMbWx2TDNObGNuWnBZMlZoWTJOdmRXNTBMM05sY25acFkyVXRZV05qYjNWdWRDNXVZVzFsSWpvaWFtVnVhMmx1Y3kxaFpHMXBiaUlzSW10MVltVnlibVYwWlhNdWFXOHZjMlZ5ZG1salpXRmpZMjkxYm5RdmMyVnlkbWxqWlMxaFkyTnZkVzUwTG5WcFpDSTZJamcwTUdGaVkySTJMVEkzT1RNdE5HVXdOaTA1WWpsa0xUVTROVEpsT1dJME16VTBaU0lzSW5OMVlpSTZJbk41YzNSbGJUcHpaWEoyYVdObFlXTmpiM1Z1ZERwcVpXNXJhVzV6TFdSbGRtOXdjMlJpT21wbGJtdHBibk10WVdSdGFXNGlmUS5taW5pSEQ3X1hoMGR3NU5qV0hWUTFDS0dNNTljUVhHRDdCMUZ3TEUyT0MxS2lGQ3pvbEZFaGRDbl9MUE9tZ3hJTkI1ck1yOGZRSVNFRG0xaHFZSnlnMTk3RHpKbXNfemhfRmUzeDVaSVVOT3BnV0FMM1U1Zmo4QzFDTDNTNV9YQkpzdXJ1SVA4UTdaOWc5LTdmTE5rOF9pdVdmNkdYWldQUFVqSENKWDR4bGNMQ1R5Nzg0ZHVDREw5eU9VMG1XRVdYemROX2RTeUpuVUNXYTIxSWt6YUR4cFR2eWFtNXBfZmN2U3U2Z0d0Z0hoMC1QQl9aeWZOSVd3NHRaT2c0NFIzMm80MVJ6blpBNDdXcXpmeHh0U1hTbkc2bFNyOTJmRENDckQwNGRrZWcwek1vdkctREdnM29uUmswZ29yME9FNWFxcnUxU1ZKWTFkWm5OU1lVSnVENlE=
kind: Secret
metadata:
  annotations:
    kubectl.kubernetes.io/last-applied-configuration: |
      {"apiVersion":"v1","kind":"Secret","metadata":{"annotations":{"kubernetes.io/service-account.name":"jenkins-admin"},"name":"jenkins-admin","namespace":"jenkins-devopsdb"},"type":"kubernetes.io/service-account-token"}
    kubernetes.io/service-account.name: jenkins-admin
    kubernetes.io/service-account.uid: 840abcb6-2793-4e06-9b9d-5852e9b4354e
  creationTimestamp: "2024-06-20T10:42:12Z"
  name: jenkins-admin
  namespace: jenkins-devopsdb
  resourceVersion: "56013"
  uid: 15e17be2-b6a2-45f8-88b3-c742a3561e15
type: kubernetes.io/service-account-token
To get the real Token, decode the secret. This will be used later in the Cloud configuration in Jenkins.
$ kubectl get secret/jenkins-admin --namespace jenkins-devopsdb -o=jsonpath='{.data.token}' | base64 --decode
eyJhbGciOiJSUzI1NiIsImtpZCI6IkRvX2w2anFteE5WaWxTZHg0U1RUZUk3ZnB6X1VHSlJ1U05CRmlDZzA2RGsifQ.eyJpc3MiOiJrdWJlcm5ldGVzL3NlcnZpY2VhY2NvdW50Iiwia3ViZXJuZXRlcy5pby9zZXJ2aWNlYWNjb3VudC9uYW1lc3BhY2UiOiJqZW5raW5zLWRldm9wc2RiIiwia3ViZXJuZXRlcy5pby9zZXJ2aWNlYWNjb3VudC9zZWNyZXQubmFtZSI6ImplbmtpbnMtYWRtaW4iLCJrdWJlcm5ldGVzLmlvL3NlcnZpY2VhY2NvdW50L3NlcnZpY2UtYWNjb3VudC5uYW1lIjoiamVua2lucy1hZG1pbiIsImt1YmVybmV0ZXMuaW8vc2VydmljZWFjY291bnQvc2VydmljZS1hY2NvdW50LnVpZCI6Ijg0MGFiY2I2LTI3OTMtNGUwNi05YjlkLTU4NTJlOWI0MzU0ZSIsInN1YiI6InN5c3RlbTpzZXJ2aWNlYWNjb3VudDpqZW5raW5zLWRldm9wc2RiOmplbmtpbnMtYWRtaW4ifQ.miniHD7_Xh0dw5NjWHVQ1CKGM59cQXGD7B1FwLE2OC1KiFCzolFEhdCn_LPOmgxINB5rMr8fQISEDm1hqYJyg197DzJms_zh_Fe3x5ZIUNOpgWAL3U5fj8C1CL3S5_XBJsuruIP8Q7Z9g9-7fLNk8_iuWf6GXZWPPUjHCJX4xlcLCTy784duCDL9yOU0mWEWXzdN_dSyJnUCWa21IkzaDxpTvyam5p_fcvSu6gGtgHh0-PB_ZyfNIWw4tZOg44R32o41RznZA47WqzfxxtSXSnG6lSr92fDCCrD04dkeg0zMovG-DGg3onRk0gor0OE5aqru1SVJY1dZnNSYUJuD6Q
Volume
To create the volume, we first need information about which K8 node it will be created on. In our case, we only have one node “srv-infrastructure-microk8-master-01”, but this information needs to be in the https://github.com/faustobranco/devops-db/blob/master/jenkins/k8-agent/volume.yaml file in spec.nodeAffinity.required.nodeSelectorTerms.
$ kubectl get nodes
NAME              STATUS   ROLES    AGE   VERSION
srv-devopsdb-01   Ready    <none>   20d   v1.31.5
Create the volume.
$ kubectl create -f volume.yaml
storageclass.storage.k8s.io/local-storage created
persistentvolume/jenkins-pv-volume created
persistentvolumeclaim/jenkins-pv-claim created
Deployment
Now, let’s create the Deployment with the container settings. https://github.com/faustobranco/devops-db/blob/master/jenkins/k8-agent/deployment.yaml
$ kubectl apply -f deployment.yaml
deployment.apps/jenkins created
It is worth validating the creation of the Deployment more carefully, and it may take a few minutes to be ready 1/1.
$ kubectl get deployments --namespace jenkins-devopsdb
NAME      READY   UP-TO-DATE   AVAILABLE   AGE
jenkins   1/1     1            1           3m35s

$ kubectl describe deployments -n jenkins-devopsdb
[...]
Service
Only after the deployment is Ready can we proceed with the creation of the service. https://github.com/faustobranco/devops-db/blob/master/jenkins/k8-agent/service.yaml
$ kubectl apply -f service.yaml
service/jenkins-service created
Validate the service
$ kubectl get services --namespace jenkins-devopsdb
NAME              TYPE       CLUSTER-IP      EXTERNAL-IP   PORT(S)          AGE
jenkins-service   NodePort   10.152.183.81   <none>        8080:32000/TCP   10h
$ kubectl get pods --namespace jenkins-devopsdb
NAME READY STATUS RESTARTS AGE
jenkins-7f6767b7b8-q4ch2 1/1 Running 4 (9h ago) 10hJenkins configuration.
Here the configuration of the new Cloud may differ slightly from a configuration in which Jenkins is installed in the same K8 cluster as the agents. Let’s continue with the Jenkins plan on a VM and using an external K8.
We need 3 configuration steps:
1 – Plugin Installation
2 – Cloud creation and configuration
3 – Creation and configuration of the Pod Template.
$ kubectl get pods --namespace jenkins-devopsdb
NAME                       READY   STATUS    RESTARTS     AGE
jenkins-7f6767b7b8-q4ch2 1/1 Running 4 (9h ago) 10hPlugin.
1 – In the already known path: Dashboard > Manage Jenkins > Plugins. Search Available Plugins for Kubernetes and install (Don’t forget to restart Jenkins)

Cloud.
2 – Now, in Dashboard > Manage Jenkins > Clouds, click on “New Cloud”. In our example, I will name this Cloud as k8-node01

Now pay attention to the settings.
The API port can be obtained as below:
$ kubectl cluster-info
Kubernetes control plane is running at https://127.0.0.1:16443
CoreDNS is running at https://127.0.0.1:16443/api/v1/namespaces/kube-system/services/kube-dns:dns/proxy
In Kubernetes URL, enter the API URL address: https://172.21.5.156:16443
Now, we need to retrieve the certificate that was regenerated at the beginning of this post, the result shown will certainly be different from the certificate you generated.
$ cat /var/snap/microk8s/current/certs/ca.crt
-----BEGIN CERTIFICATE-----
MIIDDzCCAfegAwIBAgIUXBoyFuY72dri+VhMcmgciLtzyl8wDQYJKoZIhvcNAQEL
BQAwFzEVMBMGA1UEAwwMMTAuMTUyLjE4My4xMB4XDTI0MDYxOTIzMDk1N1oXDTM0
MDYxNzIzMDk1N1owFzEVMBMGA1UEAwwMMTAuMTUyLjE4My4xMIIBIjANBgkqhkiG
9w0BAQEFAAOCAQ8AMIIBCgKCAQEAvHYRoi0P7iiRbS51qOGWyYJQM/BDMnPasgjf
XZSeOJJ5VGv+mtgATGLrfBOTW5RI0gtdhXiIFaeU4yWOqks94Gc63aGXbTkJtaQB
do7zGCSE2KYWCOY2Dg9jnrHtLb030xtrijkjb8Bktp35ZLKOPabj96M/8YBW+UyS
P0qSplKsEwtrsLP8c0arXmNjct0UPFGTOEzN4Decz3J759z6WkQe7sTHG7W9SDhF
4n3kBIsFXbeH6Ht14zy6oxOxfEmodxU3TrlFUamdINj8PfiNjD+pZGLFj7nlGJ/h
njak7NhJtea/+MHiOSSvUeKuiGoeQD6ID5GY5r7M1QS5F8eHmQIDAQABo1MwUTAd
BgNVHQ4EFgQUhK6VsBEX2nI3CJo1JrOpFfVgBZkwHwYDVR0jBBgwFoAUhK6VsBEX
2nI3CJo1JrOpFfVgBZkwDwYDVR0TAQH/BAUwAwEB/zANBgkqhkiG9w0BAQsFAAOC
AQEAMREjPGIi41KnSvcPV1OL51JhwtRMPVAaHeU4p8JMpVsa0J4dF0ri82mUCazS
AJ8+CvVpiVjd1YQtjahPir0kwyoaV/ru0ajkipPdue+itp/RFZra3dp3Z7/tlWyw
rfUrXirxg8wJ1ngQb8Iqe3cUVYNtA++kDVyembM3MGR9klxcBnKiAlJpJ4NPUzDA
vNZjqBBL+Et1bxh0Xl0MxD/QbkOR7Eux927Isq+UPXUZzYZZ4E1LPRtvema1pqyS
YTjA7NrIgPdWE+ObjlLgbfWvLDlxCTAkv2wPzOa7Mga7NiIRdTG1rb3/MMNaXPLM
ofuzfQdDoheZypeimNy832xYOQ==
-----END CERTIFICATE-----
The full contents of this certificate must be copied to the “Kubernetes server certificate key” box.
In Kubernetes Namespace, the name of the namespace we created at the beginning of this post, to support the Jenkins environment on K8.
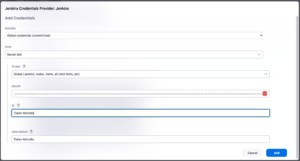
Now, we need to create a credential in Jenkins with the Token generated above in serviceAccount, when creating the Kubernetes Environment. This credential must be of type Secret text, as shown below. Copy the Token to the Secret box

In Jenkins URL, we have to put the Master URL, in our case the DNS: http://jenkins.lab.devops-db.info/
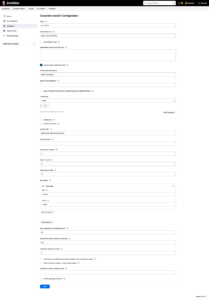
Click on the Test Connection button, it should validate that the basic settings are OK and that Jenkins can connect to the Kubernetes cluster.

Save.
Pod Template.
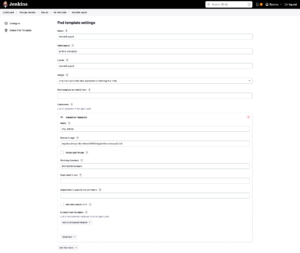
3 – Now in the left side menu, let’s create a Pod Template.
These settings will be used by the pipelines to create Pods, so we must inform Label, Image, Namespace, etc.
Namespace: The namespace we created at the beginning of this Post.
Labels: Choose a label that will be used to identify this Agent in the pipelines.
In Containers:
Name: choose any name.
Docker Image: The default image we create. Kubernetes – Base image for Jenkins Agent
Command to run: Clear this box, remove whatever is in there
Arguments to pass to the command: Same as above, remove the contents of this box.
Test pipeline.
The configurations above are the minimum necessary for Jenkins to operate agents on K8s, there are several other configurations that improve performance, security, customization, etc.
Finally, let’s create a test pipeline for the above scenario. https://github.com/faustobranco/devops-db/blob/master/jenkins/k8-agent/teste-k8.groovy
The script is the simplest, just creating an agent using the label ‘microk8-agent‘ (created in the Pod Template) and just showing a printout of the ‘env‘.
pipeline {
    options { timestamps ()
        skipDefaultCheckout(true)
    }
    agent {
            label 'microk8-agent'
          }
    stages {
        stage('Script') {
            steps {
                script {
                  sh 'env'
                       }
            }
        }
    }
}
Result.
Sometimes the pipeline gets stuck with the message below.
Validate if the Pod was created, if it is Read 1/1 and Running, if not, check what is happening, also with the service and the deployment.
There were cases that were just Pods that got stuck, due to errors in previous tests, and after some time, Jenkins deleted the POD and created another one.
[Pipeline] Start of Pipeline
[Pipeline] node
Still waiting to schedule task
'microk8-agent-jdket' is offline